Group 1

5 Things You Should Know About DIY Spray Foam Insulation

DIY Spray Foam
DIY Spray Foam

Spray foam is to your home like a cap is to a bottle of soda – keeping air from leaving and coming out, but the mysteries of spray foam don’t begin and end there. In addition to sealing air leaks (and unlike a soda cap), it also works to insulate the home. Making sure you don’t lose your head while navigating the waters of spray insulators, here are 5 things you should know about DIY spray foam insulation.

1. It’s an Insulator

Spray foam keeps your home from being uncomfortable to live in year-round (at least where temperature is concerned). Basically, it acts as an insulator by blocking cracks and gaps where air can get in or out. Installing spray foam:

  • Protects your home from extreme cold in winter
  • Protects your home from extreme heat in the summer
  • Limits entrances for critters

2. Spray Foam Measured in Board Feet

Spray foam kits are measured in board feet, or square feet. For example:

  • Spray foam insulation kits 1000 sq ft cover 1000 square feet at 1 inch thickness.
  • A 600 board foot kit will cover 600 square feet at 1 inch thickness or 300 square feet at 2 inches thick
  • A 200 board foot kit will cover 200 square feet at 1 inch thickness, and so on.

What makes it a smart investment is that it expands, so a little goes a long way as it expands rapidly. So to calculate how much foam you would need for your project, calculate the square footage to be covered first. Then decide on the desired thickness to achieve you desired insulation level. e.g. for closed spray foam the R Value is 7.12 per inch. If your area to be sprayed is 580 square feet and you want an R value of 14, then you would need (2) 600 board feet spray foam kits to finish your project.

3. Where You Should Use It

There are many areas where spray foam insulation can be of use, but these places make the overall top 3-5 list:

  • Attics and Garages – Most attics and garages are poorly insulated areas, always either overly hot or overly cold.
  • Basements – Basements fall prey to humidity, breeding mold and mildew when not properly insulated.
  • Walls, Ceilings and Floors – Air leaks are at home in the cracks/gaps found in walls, ceilings and floors.

4. How to Use Spray Foam

To get an even stream of foam, the DIY spray foam “B” tank needs to be warmed up to 70 degrees Fahrenheit before use. The warming makes it the same, milky consistency of the “A” tank. Tank can be warmed by:

  • Storing it in a warm room
  • Covering tank with an electric blanket
  • Using a tank warmer

Spraying 1″ thickness expands 30 times, so be a little conservative with spraying the foam.

Finally, always wear protective gear (goggles, gloves, disposable coverall) when completing DIY projects.

5. It Saves You Energy and Money

Spray foam protects the energy in a home from escaping and prevents outside air from breaking through, giving you – not air leaks and the gas company – control over the temperature in your home and the results of your heating bill.

Energy

Proper insulation makes it easier for the air system in your home to work the way it was intended to, preventing the need to adjust the heating/cooling system throughout the day.

Money

During winter, heating costs alone are 2% on every degree you raise the thermostat. That’s money spent on energy flying straight through all of those gaps and cracks. You can reduce your energy costs by up to 20% by using DIY spray foam and other energy efficient tools.

Ultimately, the comfort of your home and ease on the wallet make using DIY spray foam a smart, energy and cost efficient solution to your heating and cooling woes.

Save

Save

Save

Save

Group 1

DIY Spray Foam Insulation: A Cost Effective Way to Insulate

With the intense rise of heat and humidity, energy conservation for homeowners is more significant than ever. Homeowners are finding an increase in their energy bills and are unaware that they can reduce costs by installing spray foam insulation inside of their homes.

One of the most economical and useful ways to insulate your home is using a unique product called spray foam. DIY Spray Foam Insulation is beneficial by preventing heat increase in the summer and heat decrease in the winter, and also, lowering the costs of your monthly energy bills! If you think that is great, it gets better. Since spray foam is easy to install it is a great DIY product that any homeowner can use. So, there is no need to worry about contracting anyone to do the job for you. Furthermore, this will guarantee that both your home and your wallet are protected from unnecessary expenses.

How It Works:

When the Touch ‘N Seal Foam mix is sprayed onto your walls, floors and ceilings, the shell of your home becomes protected. It’s this protection that blocks heat gain in the summer and heat loss in the winter, thus preventing dramatic temperatures changes in the home. Correctly installed, insulation delivers comfort and lower energy bills during the hottest and coldest times of the year. In fact, if you seal air leaks with caulk before you insulate, you can save up to 20% on your heating and cooling*, as insulation works best when air is not moving through or around it.


Benefits
:

  • Durable
  • Easy to Use
  • Flexibility (large or small projects)
  • Keeps energy costs down

So, if you’re looking to take on an insulation project this fall, consider doing it yourself with a Spray Foam Insulation Kit. If you’re still not comfortable with making that investment, then test it out with an inexpensive 15 Board Foot Spray foam kit. At $45 it’s a great way to get your feet wet with spray foam insulation.

Group 1

Insulating Outside with Pur Black Foam

Pur Black Foam
Pur Black Foam

There are a number of cracks and gaps located inside the home that let the air from outside come in. This leads to extreme energy loss, which in turn results in higher energy bills. Just as important as sealing air from the inside is applying insulation outside. Pur Black Foam is applied on the outside of the home where necessary to prevent air from leaking out and raising energy costs.

Pur Black Foam is a low expansion, closed cell foam ideal for sealing problematic areas outdoors. The black color it has allows it to blend well in outdoor settings. It is commonly used around doors and windows, in basements, and in attics to seal cracks and gaps. Pur Black Foam comes in a canister that should be attached to a foam gun for application. The exact foam gun necessary depends on the area being insulated. For larger areas, a foam gun with a larger opening for application would be best, whereas for sealing smaller areas a foam gun with a smaller opening would be ideal. Each can produces enough foam to cover 1,200 linear feet at 1/2” bead. Within 10 minutes it is tack-free, and within 30 minutes it can trimmed.

Studies show that the average homeowner spends as much as $3,400 in the span of 5 years on energy that is wasted as a result of air leaks. Reducing the amount of air leaks that occur in the home significantly reduces the amount of money spent on them every year. Also, sealing these leaks allows you to control the way the home feels, as you will have less of a battle to fight with outdoor temperatures. Pur Black Foam allows you to eliminate air leaks from the outside, gain control over home temperatures, and save money on energy bills all at the same time.

Group 1

Comparing 2 Part Spray Foam to 1 Component Spray Foam

Types of Spray Foam Insulation

As the season of extreme temperatures gets closer, have you given any consideration as to how you can regulate the cost of energy? Applying spray foam insulation in the rooms that are poorly insulated, such as the basement, garage, and attic, dramatically reduces energy loss as well as the cost of energy. There are two different types of spray foam insulation that are ideal for different situations: 1 component spray foam, and 2-part spray foam. Having knowledge of the type of insulation you need helps speed up the process of sealing these costly air leaks.

1 Component Spray Foam

  • Expansion Amount: 10% when applied at 1/2″ thickness
  • Curing time: 20 minutes
  • R-Value: 5.4 (per inch)
  • Number of tanks: 1

As a result of this being a low expansion foam, 1 component spray foam is commonly used to seal air leaks around doors, windows, HVAC and electrical penetrations, plumbing, and other small-sized areas where leaks occur. The foam should be kept at room temperature. It cures when exposed to moisture, so if you are going to use this insulation on a cold or dry day, be sure to use a spritzer to assist with the curing process.

2 Part Spray Foam

  • Expansion Amount: 30 times when applied at 1” thickness
  • Curing Time: Within 1 minute
  • R-Value: 7.12 per inch
  • Number of tanks: 2

The high expansion 2 part spray foam is used to seal large-scale air leaks. It is commonly used to insulate walls, floors, and ceilings. This type of insulation has a higher R-value than 1 component spray foam, making it a more effective insulator. As with 1 part foam, the two tanks should be left at room temperature. Also note that the tanks are of different consistencies, and one tank needs to be warmed up to match the consistency of the other once you are ready for application.

Both 1 component spray foam and 2 part spray foam are closed cell, meaning the cells in the foam are packed closely together, instead of loosely. This provides the foam with strength and enables it to be water resistant, although not waterproof. All instructions regarding safety and application should be followed carefully. Regardless of the type that is necessary for your home, spray foam insulation seals air leaks and continues to save money on energy bills long after it has been used.

Group 1

Closed Cell Foam Vs. Open Cell Foam: What’s The Difference?

Touch N Seal Foam
Touch N Seal Foam

Applying spray foam insulation to ceilings and walls is one of the best ways to insulate the rooms that act as a passageway for drafts and outside air during extreme weather months; rooms such as the attic and basement. Sealing up the cracks and gaps in these rooms with spray foam insulation helps reduce the amount of energy used to heat and cool the home, as well as the amount of money spent on doing so. Closed cell and open cell Touch N Seal foam are two types of spray foam insulation that can be used for insulating these rooms.

Closed cell Touch N Seal foam gets its name because the foam cells are packed together and closed. The strength and density of this foam allow it to be resistant to water absorption. Additional important details about closed cell foam include:

  • Expansion: up to 30 times when applied at 1″ thick
  • Density: 1.75 +/- 0.2 pounds per cubic feet
  • R-Value: 7.12 per inch

In contrast, the cells in open cell foam are not closed completely or packed close together, and this type of foam readily absorbs water. Keep in mind these important details about open cell foam when deciding which type you need:

  • Expansion: 100 times the liquid volume
  • Density: 0.4 to 0.5 pounds per cubic feet
  • R-Value: 3.5 per inch

Closed cell and open cell Touch N Seal foam are different in a number of ways. While open cell foam typically costs less, the strength, density, and higher R-Value of closed cell foam makes it the more advantageous of the two.

Save

Group 1

How to Install Outlet Insulation in Your Home or Building

Electrical outlets located on exterior walls can act as a gateway for air leaks and energy loss. In fact, this source is responsible for approximately five percent of all energy loss experienced in the average home. Insulation for this area is useful throughout the year. Installing outlet insulation prevents cold air from coming in during winter, and cool air from leaving during summer. Installing insulation for outlets is a simple task that can be completed in a few steps.

Outlet Insulation
Outlet Insulation

In order to install foam insulation without exchanging the original wall plate:

  1. Use a screwdriver, remove the existing outlet plate.
  2. Place the insulating foam gasket behind the wall plate cover.
  3. Place the newly insulated cover back over the outlet.

In order to install outlet insulation that comes with the wall plate:

  1. Remove the existing wall plate using a screwdriver.
  2. Place the outlet cover with the foam gasket already installed over the electrical outlet.

The type of outlet insulation required depends on where it needs to be installed. For single outlets, wall switches, and single decora-style (rocker) switches, the standard foam insulation can be used. For double, triple, or quad outlet and switch sources, the wall plates that come with the foam gaskets pre-installed may be a better option. If you would prefer to not have to get a new wall plate, simply cut the standard foam gaskets into the shape that you need.

Using electrical outlet insulation will effectively seal off air leaks from this area. Insulation can be installed in less than five minutes, and can reduce the amount of energy and heat loss by five percent. For even more detail, check out the video below to see exactly how to install switch gaskets.


Switch Gaskets

Group 1

Foam Door Sweeps for Exterior Doors Make Insulating Simple

door sweeps for exterior doorsSome consider insulating to be difficult work, a task to be left for the pros. Others consider insulating to be an option available only to homeowners, not renters. These both couldn’t be farther from the truth. There are many simple solutions to drafts in the home. One of the easiest places to insulate is the door. The door lets air into the home and sucks air out whether it is left wide open, or locked tightly. Door foam sweeps for exterior doors help eliminate this problem with little effort on your part.

Sometimes referred to as a door draft seal, this type of insulation can be installed in three simple steps, and stays in place, gliding with the door:

  1. With a pair of scissors, cut the foam tubes to the desired length
  2. Place each foam tube into a fabric sleeve
  3. Slide the insulator under the door

There are many benefits to this form of door insulation. Once this has been installed, there will be a reduction in the amount of unwanted air exchanges that occur through the doors, leading to a reduction in energy costs. In addition to being simple to install, it can be removed easily by sliding it from beneath the door, and is machine washable. The door draft seal can be installed over linoleum, wood, carpet, or tile. For all of these reasons, foam door sweeps for exterior doors are ideal for any homes that need insulation at the door.

Save

Group 1

Spray Foam Insulation: An Economical Way to Insulate Your Basement

Spray Foam Insulation for Basement

As we approach winter, are you among the homeowners who are thinking of how to limit the number of indoor drafts that are common during cold weather months? Reducing the amount of cold air coming in the home as well as the amount of warm air leaving can be done by insulating the rooms that are the greatest sources of air leaks. Among these is the basement. Spray foam insulation for basement use is a cost-effective way to solve the issue of air leaks in this room.

Spray foam insulation for basement use blocks both cold and hot air from entering the basement (and then the living area). The foam does this when applied to basement exterior walls, joints, and in corners. It creates a thermal barrier that prevents air leaks and does not retain any moisture, which can lead to molding problems. Using closed cell foam is especially effective since it’s a denser material and is more efficient at insulating than open cell foam.

Applying foam is simple enough to be a DIY project, and cost-effective as well.  A 600 board foot spray foam kits costs roughly $600. So that gives you 600 square feet of insulation at 1 inch thick.

Spray Foam Insulation is designed with the DIYers in mind. Foam is dispensed from pressurized tanks using a gun hose kit. To start using, test the foam out a few times to get the hang of using it. Spray foam insulation for basement use is ideal for insulation projects being done on a budget. In addition, it pays for itself in a matter of months with the savings on heating and cooling.

Save

Group 1

How to Weatherproof Your Electrical Outlets

elecoutletThere are many places where energy may be escaping the home: the basement, attic, and garage to name a few. Electrical outlets and wall switches are sources for air leaks that are very often overlooked, meanwhile accounting for 2 to 5 percent of home energy loss. Electrical outlet insulation comes in either a foam gasket or an outlet cover with a foam gasket installed.

Foam gaskets insulate outlets by blocking the unwanted exchange of air coming in and out of the home through this source. To install, remove the wall plate, and place the foam gasket behind the plate of the electrical outlet or wall switch that needs to be insulated. If you choose to insulate outlets this way and would like to fit the gaskets into decora-style plates, the foam can easily be reshaped for this purpose.

elecoutletThe other type of electrical outlet insulation is the wall plate that comes with the foam already installed. Simply remove the current outlet or switch cover, and in its place, install the cover with the foam gaskets behind it. Insulated switch plates are available for a variety of applications, such as single and multi-switch plates as well as cable and phone jacks.

Electrical outlet insulation is good for not only your home, but pockets too. Once sealed, you no longer have to worry about the unwanted exchange of air from this source and the effect it has on energy bills. Each foam gasket costs as little as 10 cents, and the plate covers cost less than a meal at your favorite fast food place. Also, they could not be easier to  install. If you can turn a screwdriver, you can insulate the outlets in your home.

Shop for Electrical Outlet Sealing>>>

Group 1

Spray Foam Insulation Kits: Worth the Weight in Foam

Have you noticed during summer the temperatures in the attic and basement areas are hot enough to barbeque in (sans grill!)? Each room in the house should be inviting, but during extreme weather months entering these areas seems more like self-inflicted torture. If you are profusely shaking your head in agreement, may I suggest that now is the time to consider proper insulation? Spray foam insulation kits seal your home from this unwanted air, and with the acquired savings in heating and cooling costs; the kit pays for itself within a year.

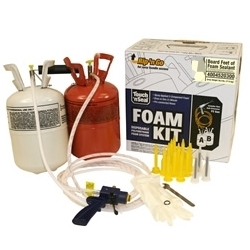
Spray Foam Insulation Kits

Weighing in at 120 lbs. and allowing for a tax credit of up to 30% is what we like to call the spray foam insulation kit. Spray foam insulation kits are essentially two tanks of chemicals which expand up to 30 times when applied to walls and floors, which then work to close up tricky air leaks in a home. You may not realize it, but over the course of 5 years these leaks can cost up to $3,400 (Somewhere out there is an endless list of much better ways to spend that money). The spray polyurethane foam kit continues to save you money long after it has paid for itself, as you will no longer need to tamper with the heating and cooling system in your home.

When choosing to insulate a home, tackle the attic and basement areas first. Once you have used a spray foam kit to seal the largest sources of air leaks, the energy spent (and money needed to provide that energy) will noticeably decrease. As if this wasn’t good enough, the spray polyurethane foam kit also prevents molding and helps keep bugs out. The time has come for you to conquer your fear of that blazing hot room. If you feel yourself faltering, just consider how happy your wallet will be once this task is done.