Group 1

DIY Insulation: Closed Cell Spray Foam Kits

Closed Cell Spray Foam Kits

If you live in North America, you’re probably experiencing record breaking cold temperatures this year. Related to that, you’re probably also seeing shocking energy bills. Lack of insulation is the main cause of high energy usage in homes and buildings. Spaces that don’t have insulation are the main trouble spots for loss of heat in the winter and also gain of heat in the summer. So, do you hire an insulation contractor and shell out thousands of dollars? A good low-cost solution to insulating your home is via Do-It-Yourself Closed Cell Spray Foam Kits.

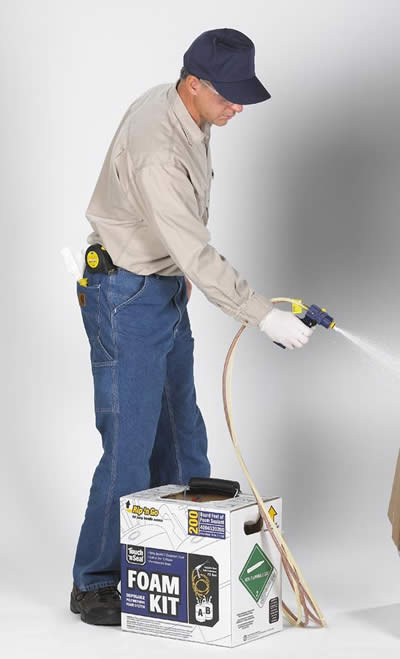
A spray foam kit comes with everything you need to insulate those trouble spots in your home or building. It contains a dispensing gun hose assembly as well as cones and nozzles to provide more control over the way it is sprayed. There are 2 types of spray foam available: closed cell and open cell. In closed cell foam, the cells of the chemical are closed and hence have a rigid and denser structure. Open cell foam by contrast has a more open cell structure and therefore has a more sponge like texture. As a result, closed cell foam has a higher R value than open cell foam. Another difference is closed cell foam acts as an air and water vapor barrier, whilst open cell foam is only suitable as an air barrier. Therefore, open cell foam is not recommended for use outside.

Closed Cell Spray Foam is very useful for insulating places such as: garages, rafters, walls and floors as well as roofing and outdoor projects. DIY Spray Foam Insulation comes variety of sizes such as 600, 200 and 15 Board Foot. Board foot just means that one 600 board foot kit will cover a 600 square foot area with 1 inch of foam. So, whether you need to insulate a whole wall in your basement, or you just need to insulate a small area, there is spray foam size for your need. Another advantage of closed cell foam is that it comes in a Fire-Retardant formula. This is useful because some city codes require insulation to have fire retardant formulas.

So if you’re looking for a low cost, do it yourself solution for insulating those cold areas of your home, Closed Cell Spray Foam is a great option. And if you’re unsure if you’re up to the task, there are plenty of instructional guides and videos available to help you.

Save

Save

Save

Save

Save

Group 1

Understanding the Types of DIY Foam Insulation

DIY Foam Insulation
DIY Foam Insulation

You don’t need to be a conservation specialist to understand foam insulation; more importantly you don’t need expert knowledge to install it. Whether sealing large areas, small areas, or openings in-between, understanding the types of DIY spray on insulation will go a long way towards raising the comfort level in your home.

R-Value and What it Means for Foam Insulation

Insulation material needs to resist heat to be effective: this is R-value. R value is measured based on the density, thickness, and type of material (spray foam) and it tells us if the material holds a high or low amount of thermal resistance. Both types of foam, closed and open cell, offer different R-values and benefits for insulation.

Closed cell foam

The cells in closed cell foam are packed tightly together, so it insulates better. Because the cells are packed so tightly, the foam also has a high resistance to heat and water – meaning that is boasts a high R-value. Though the R-value is high, over time that number can decrease.

Closed cell, or high expansion foam, better insulates large areas like attics, basements, and garages. FYI: A little goes a long way with high expansion DIY foam insulation – spray only 1″ of this to see it expand 30x.

Open cell foam

The cells in open cell, or low expansion spray foam are loosely packed, and the R-value is lower, but – installed in the right place – this is not a disadvantage for insulation. Open cell foam works as an air barrier, and unlike closed cell foam the R-value of open cell foam will not change over time.

Low expansion DIY spray on insulation expands by only 10% of the initial spray size, so it’s best used in small areas, like cracks and gaps in floors, walls, windows, etc.

It only takes a little information, the right type of foam, and the right amount to properly insulate your home.

Save

Save

Group 1

5 Things You Should Know About DIY Spray Foam Insulation

DIY Spray Foam
DIY Spray Foam

Spray foam is to your home like a cap is to a bottle of soda – keeping air from leaving and coming out, but the mysteries of spray foam don’t begin and end there. In addition to sealing air leaks (and unlike a soda cap), it also works to insulate the home. Making sure you don’t lose your head while navigating the waters of spray insulators, here are 5 things you should know about DIY spray foam insulation.

1. It’s an Insulator

Spray foam keeps your home from being uncomfortable to live in year-round (at least where temperature is concerned). Basically, it acts as an insulator by blocking cracks and gaps where air can get in or out. Installing spray foam:

  • Protects your home from extreme cold in winter
  • Protects your home from extreme heat in the summer
  • Limits entrances for critters

2. Spray Foam Measured in Board Feet

Spray foam kits are measured in board feet, or square feet. For example:

  • Spray foam insulation kits 1000 sq ft cover 1000 square feet at 1 inch thickness.
  • A 600 board foot kit will cover 600 square feet at 1 inch thickness or 300 square feet at 2 inches thick
  • A 200 board foot kit will cover 200 square feet at 1 inch thickness, and so on.

What makes it a smart investment is that it expands, so a little goes a long way as it expands rapidly. So to calculate how much foam you would need for your project, calculate the square footage to be covered first. Then decide on the desired thickness to achieve you desired insulation level. e.g. for closed spray foam the R Value is 7.12 per inch. If your area to be sprayed is 580 square feet and you want an R value of 14, then you would need (2) 600 board feet spray foam kits to finish your project.

3. Where You Should Use It

There are many areas where spray foam insulation can be of use, but these places make the overall top 3-5 list:

  • Attics and Garages – Most attics and garages are poorly insulated areas, always either overly hot or overly cold.
  • Basements – Basements fall prey to humidity, breeding mold and mildew when not properly insulated.
  • Walls, Ceilings and Floors – Air leaks are at home in the cracks/gaps found in walls, ceilings and floors.

4. How to Use Spray Foam

To get an even stream of foam, the DIY spray foam “B” tank needs to be warmed up to 70 degrees Fahrenheit before use. The warming makes it the same, milky consistency of the “A” tank. Tank can be warmed by:

  • Storing it in a warm room
  • Covering tank with an electric blanket
  • Using a tank warmer

Spraying 1″ thickness expands 30 times, so be a little conservative with spraying the foam.

Finally, always wear protective gear (goggles, gloves, disposable coverall) when completing DIY projects.

5. It Saves You Energy and Money

Spray foam protects the energy in a home from escaping and prevents outside air from breaking through, giving you – not air leaks and the gas company – control over the temperature in your home and the results of your heating bill.

Energy

Proper insulation makes it easier for the air system in your home to work the way it was intended to, preventing the need to adjust the heating/cooling system throughout the day.

Money

During winter, heating costs alone are 2% on every degree you raise the thermostat. That’s money spent on energy flying straight through all of those gaps and cracks. You can reduce your energy costs by up to 20% by using DIY spray foam and other energy efficient tools.

Ultimately, the comfort of your home and ease on the wallet make using DIY spray foam a smart, energy and cost efficient solution to your heating and cooling woes.

Save

Save

Save

Save

Group 1

DIY Spray Foam Insulation: A Cost Effective Way to Insulate

With the intense rise of heat and humidity, energy conservation for homeowners is more significant than ever. Homeowners are finding an increase in their energy bills and are unaware that they can reduce costs by installing spray foam insulation inside of their homes.

One of the most economical and useful ways to insulate your home is using a unique product called spray foam. DIY Spray Foam Insulation is beneficial by preventing heat increase in the summer and heat decrease in the winter, and also, lowering the costs of your monthly energy bills! If you think that is great, it gets better. Since spray foam is easy to install it is a great DIY product that any homeowner can use. So, there is no need to worry about contracting anyone to do the job for you. Furthermore, this will guarantee that both your home and your wallet are protected from unnecessary expenses.

How It Works:

When the Touch ‘N Seal Foam mix is sprayed onto your walls, floors and ceilings, the shell of your home becomes protected. It’s this protection that blocks heat gain in the summer and heat loss in the winter, thus preventing dramatic temperatures changes in the home. Correctly installed, insulation delivers comfort and lower energy bills during the hottest and coldest times of the year. In fact, if you seal air leaks with caulk before you insulate, you can save up to 20% on your heating and cooling*, as insulation works best when air is not moving through or around it.


Benefits
:

  • Durable
  • Easy to Use
  • Flexibility (large or small projects)
  • Keeps energy costs down

So, if you’re looking to take on an insulation project this fall, consider doing it yourself with a Spray Foam Insulation Kit. If you’re still not comfortable with making that investment, then test it out with an inexpensive 15 Board Foot Spray foam kit. At $45 it’s a great way to get your feet wet with spray foam insulation.