Group 1

Stay Warm and Save with Window Air Conditioner Covers

Window Air Conditioner Covers
Window Air Conditioner Cover

During the hotter months of the year, there is often nothing more comforting than knowing you have a working air conditioning unit. If this unit is of the indoor wall variety, that comfort can easily become an annoyance as cold weather sets in. Drafts can easily enter the home through these units, which not only causes heat loss and discomfort, but raises energy bills as well. Installing window air conditioner covers helps you stay warm and save money on energy this winter.

How the Covers Work

Window air conditioner covers come with a fabric cover, waterproof sheets (windblock liners), and a roll of tape. The fabric has an insulating fiber on the inside, and is designed to fit perfectly over the unit. The sheets are taped to the unit to protect the seal from inclement weather conditions and keep the air waterproof. In addition, this layer prevents cold air from coming into the room through the air conditioner. In doing so, the insulation is saving energy, by reducing the amount of energy the heating unit requires to warm the home up. In turn, this leads to savings on energy costs.

Choosing the Right Size

Indoor air conditioners come in a variety of sizes, and so do covers. Before purchasing a cover be sure to measure your wall air conditioner. There are three different size air conditioner covers, and they allow about 1″ of give for each unit:

  • Small: From 12″ x 14″ in height and 18″ to 21″ in width
  • Medium: From 15″ to 17″ in height and from 22″ to 25″ in width
  • Large: From 18″ to 20″ in height and from 26″ to 28″ in width

Installing Window AC Covers

All you need to install window air conditioner covers besides the items they come with is a pair of scissors. Important to keep in mind is that the tape holds best when the temperature outdoors is above 35°F.

  1. Unplug the air conditioner and wrap the electric cord as tightly around the front edge of the unit as possible. Hold it in place using a 3″ piece of tape.
  2. Measure the width and height of the unit, adding 6″ to each measurement. This is the measurement you will use when cutting (with scissors) the windblock liners.
  3. Place the windblock liner over the front of the air conditioner, allowing it to overlap by 3″ on each side. For the best results, make sure the windblock also covers the electric cord, plug, and the place on the unit where the cord exits.
  4. Fold and tape square corners, then use the tape to hold the complete edge of the liner to the unit. Make sure that the tap overlaps so half is attached to the liner, and half is attached to the air conditioner.
  5. Place the fabric cover over the air conditioner.


By insulating the window AC unit, there will be less outdoor air interfering with the temperatures inside the home. Limiting the places where drafts can enter the home results in gaining more control over home temperatures, reducing the amount of energy and heat lost, and spending less money to keep yourself and your loved ones warm this winter.

Group 1

Keep Cold Air Out and Warm Air In with Plastic Windows

Plastic Windows
Plastic Windows

As the year draws to a close, people are planning various parties, decorating their homes, and coming up with resolutions they’re sure to break within the first few months of the new year. It also happens to be during this time of the year that many see a dramatic increase in the amount of money paid for energy, specifically for heating. This is due largely to poor insulation, which allows the air from outside to make its way into the home. One of the simplest and most cost-effective ways to reduce this problem is by installing plastic windows.

Keeping Cold Air Out
Windows make up anywhere from 10 percent to 25 percent of home heat and energy loss. You may be wondering how an item that sounds as simple as a plastic window could possibly eliminate this loss, or even lower the amount. The plastic film is also an insulating film. When correctly installed over the face of the window, it blocks cold air from entering the home through windows, which will also stop the warmer air from leaving.

Types of Plastic Windows
Plastic windows, also referred to as interior storm windows, come in two different styles: those with channeling, and those without.

Channeling: This type of interior storm window comes with plastic channeling, clear film, and adhesive. The channeling coupled with the plastic gives the appearance of placing a new window frame over the existing one.

Without Channeling: Storm windows without channeling include only the insulating plastic and a roll of tape. Although it has less components than the windows with channeling, it has more steps for installation.

Both types are also cost-effective. Storm windows without the channeling cost approximately $3 to $6, while storm windows with channeling are valued at $9 to $15. They are available for a variety of window sizes, so be sure to take measurements before making a purchase.

Installing Storm Windows
Installation of the window kit with channeling can be completed in a few simple steps:

  1. Attach plastic channels around the frame of the window.
  2. Over the face of the window, spread the plastic insulation film.
  3. Using the thin plastic strip (the spline), hold the plastic in place, and lock it into the channel.
  4. Trim the channels and spline if necessary using a utility knife. The plastic film can be trimmed with scissors.

Installing plastic windows without channeling can be completed by doing the following:

  1. Clean around the window surface’s edge, and allow it to dry.
  2. After a 10-minute wait, place the tape around the edges
  3. Cut the plastic film in a way that allows there to be a 2-inch overlap on either side of the window.
  4. At the top of the window, press the plastic against the tape lightly, and gently stretch and press the film at the bottom. Carefully repeat this along the sides.
  5. Once set, press the plastic film firmly against the tape.
  6. Using the highest setting on a hair dryer, pass it over the film. Make sure the dryer is being used at a 1″ distance, and never comes in contact with the plastic.
  7. The film should shrink until all wrinkles appear.
  8. Trim away any excess film with scissors.


Once the window insulation has been installed, you won’t have to worry about cold air coming in through your windows while heated air leaks out. Also, with 10-25 percent of heat loss eliminated from energy costs, the fear of higher energy bills this winter will also be pushed to the back of your mind.

Group 1

Sealing Gaps with Exterior Door Weatherstripping

Exterior Door Weatherstripping

Call them cracks, gaps, leaks or however you want to see it, but any opening that allows air through the door adds stress to your energy bill. Prevent air leaks by sealing gaps with exterior door weatherstripping. You’ll gain control over the energy usage in your home while trimming the energy expenses off your utility bill.

Do you need weatherstripping?
It doesn’t matter if the crack, gap, or hole is micro-sized or big enough to slip a few magazines through; any air leak takes the comfort out of your home and costs you extra in heating and cooling expenses.

Test for air leaks
If the sunshine outside is spilling into your home through a closed door, you have an air leak situation. Another way you can tell is if rain always finds its way inside your home through doors even when the door is closed. Easily combat this issue by installing exterior door weatherstripping.

Q-lon weatherstripping
Q-lon is an type of weatherstripping that is installed on the top and sides of doors. It is backed with aluminum (metal/steel), vinyl (PVC), or wood and made of polyethylene-clad urethane foam. Available in white and brown colors, q-lon is specifically made to fit different door types:

  • Aluminum – Made for metal doors
  • Wood – Made for wooden doors
  • Vinyl – This type can be used on most home doors

This type of weatherstripping seals up to 1/2″ gaps on standard doors and can be cut to fit smaller doors.

Reasons to seal
Energy Usage/Money Waste
On average, exterior doors are responsible for roughly 11 percent of all energy loss in the home. You close the door hoping to keep out the heat or cold, but all of that air still gets in. This:

  • Causes inconsistent temperatures in the home
  • Raises your energy bill. Every increase/decrease in degree that you turn up/down the AC or heater causes you money.

Block Unwanted Guests
Well, sealing only keeps out the type of guests that can squeeze through a closed door. Bugs and other critters are always on the hunt for ways to enter your home. Installing exterior door weatherstripping leaves one or two less ways for them to invade your home.

Sealing door exteriors is a simple solution to a costly and energy-stealing problem.

Group 1

Using Attic Stair Covers to Reduce Energy Loss at Home

Attic Stair Covers
Attic Stair Covers

Have you ever had to put on a winter jacket while cleaning out your attic, or have you experienced the other extreme and worn only essential clothing items just to avoid getting a heatstroke up there? Inconsistent temperatures in the attic stem from major gaps in insulation, and that often leads to having less control over temperatures in the living space. One of the simplest ways to prevent the environment in your attic from negatively impacting the living area is to invest in attic stair covers, which block air from leaking out of and into your attic.

The 3 Ways to Cover Attic Stairs

Three types of covers that help protect the airflow on attic stairs include Attic Tent, ThermaDome Cover, and McCoy LadderMate. When choosing between these attic stair covers, keep in mind the R-value (the measure of how well it insulates), size, and material the cover is made of and how these factors work with your attic stairs.

Attic Tent

The name is a perfect reflection of its functionality: Attic Tent. Installed above the attic door (on the inside of the attic), it works as a cover, or tent, and is versatile enough to insulate attic doors, folding attic stairs, knee doors, and scuttle holes. Attic Tent is super easy to install and can cut down air transfer to/from your attic by up to 71% .

  • R-Value: 3.2
  • Sizes (measured in inches): 22 x 54 x 7, 22 x 54 x 13, 25 x 54 x13, 30 x 60 x13
  • Material: Made from high tech, fire retardant, cloth-like material

Therma-Dome Cover

Therma-Dome Covers are lightweight lids for folding attic stair doors (they also work on the inside of the attic), and provide strong insulation. More steps and tools are needed to install Therma-Dome than used for Attic Tent, but the extra work also leads to faster results on your energy bills.

  • R-Value: 13
  • Sizes (measured in inches): Inside 27 x 57, and 10.5 in. deep, made to fit all attic stair sizes
  • Material: 1 1/2″ of polyisocyanurate board foam that is sandwiched between laminated foil

McCoy LadderMate

The LadderMate works to insulate the attic ladder door and the opening. The McCoy Laddermate is heavier than the Tent and Dome, but it allows for easier access to the attic via a 30 in. push/pull rod. It takes mere minutes to install this attic cover, and it doesn’t need any additional trim around the opening.

  • R-Value: 10
  • Sizes (measured in inches): 22.5 x 48, 22.5 x 54, 25 x 48, and 25 x 54 (one model will cover all four sizes)
  • Material: 2 in. foam insulation and weatherstrip gasket

Drafty homes are uncomfortable to live in and can be a bigger drag on your finances than you may realize. By installing attic stair covers and properly insulating your home in other open areas, you gain consistent heating/cooling throughout the house while earning a boost in energy savings and reducing energy costs.

Group 1

Installing an Attic Tent to Reduce Energy Loss at Home

Attic Door Insulation Cover
Attic Tent

How often would you like the air from the attic to mix with the air in the living area of your home? Unless your attic is properly ventilated and insulated, the answer is probably never, right? Insulating the entire attic can be a time-consuming and costly project. If it is one that is not within your budget this summer, installing an attic tent will help you reduce unwanted air exchanges and energy waste experienced at home without breaking the bank. Once you have chosen the right size attic door insulation cover, it can be installed in a matter of minutes.

Choosing the Right Size

We’re all guilty of purchasing a new outfit only to realize it may be a size too big or too small. That could have been avoided by trying it on first, right? Apply this same concept to choosing your attic tent. Before purchasing one, make sure you know what size you should be looking for. Measure the width, length, and height of the attic door way when folded. The average attic door size would use the AT-2 model, which measures 25″x54″x7″. If the attic ladder side rail is made with a 1×4, a height of 7″ is necessary. If the side rails are made with a 1×5 or 1×6, a height of 13″ is required.

Installation

An attic door insulation cover can be installed over attic stairs, knee wall doors, and over an attic scuttle hole. The installation method depends on which of these applications you will be using the attic insulation for:

A) Attic Stairs

  1. At the end of the attic stair box, place the attic tent. The zipper heads should be hinged at the end.
  2. On all four sides, staple the rough frame to the mounting hinge (staple about every 2-3 inches along).
  3. Use a bead of caulk to seal any air leaks between the rough frame and mounting flange.

B) Knee Wall Door

  1. The attic tent should be vertically aligned to the back of the door frame. Make sure the zipper end is down.
  2. To attach to the floor, fold the flange under the zipper side.
  3. On the attic side, staple around the door frame, and use a bead of caulk for sealing.

C) Attic Scuttle Hole

  1. Use a piece of 1/2 inch plywood, for example measuring 24″x35″ to be attached along the attic floor joist and the connecting side of the access hole.
  2. Seal other adjoining areas to allow the tent to have the required mounting surface.
  3. Placing the zippers close to the access, position the insulation cover over the scuttle hole.
  4. Staple the flange of the tent around the plywood and access frame.
  5. As with the other applications, apply a bead of caulk for a tighter seal.

With a little time and the right tools, you can begin to reduce energy loss and protect the home from the harsher temperatures of the attic during extreme weather months. The added insulation provided by an attic tent will not only allow you to gain more control over the temperature indoors, but it will reduce energy bills by up to $170 each year it is left in place.

Save

Save

Save

Save

Save

Group 1

Comparing 2 Part Spray Foam to 1 Component Spray Foam

Types of Spray Foam Insulation

As the season of extreme temperatures gets closer, have you given any consideration as to how you can regulate the cost of energy? Applying spray foam insulation in the rooms that are poorly insulated, such as the basement, garage, and attic, dramatically reduces energy loss as well as the cost of energy. There are two different types of spray foam insulation that are ideal for different situations: 1 component spray foam, and 2-part spray foam. Having knowledge of the type of insulation you need helps speed up the process of sealing these costly air leaks.

1 Component Spray Foam

  • Expansion Amount: 10% when applied at 1/2″ thickness
  • Curing time: 20 minutes
  • R-Value: 5.4 (per inch)
  • Number of tanks: 1

As a result of this being a low expansion foam, 1 component spray foam is commonly used to seal air leaks around doors, windows, HVAC and electrical penetrations, plumbing, and other small-sized areas where leaks occur. The foam should be kept at room temperature. It cures when exposed to moisture, so if you are going to use this insulation on a cold or dry day, be sure to use a spritzer to assist with the curing process.

2 Part Spray Foam

  • Expansion Amount: 30 times when applied at 1” thickness
  • Curing Time: Within 1 minute
  • R-Value: 7.12 per inch
  • Number of tanks: 2

The high expansion 2 part spray foam is used to seal large-scale air leaks. It is commonly used to insulate walls, floors, and ceilings. This type of insulation has a higher R-value than 1 component spray foam, making it a more effective insulator. As with 1 part foam, the two tanks should be left at room temperature. Also note that the tanks are of different consistencies, and one tank needs to be warmed up to match the consistency of the other once you are ready for application.

Both 1 component spray foam and 2 part spray foam are closed cell, meaning the cells in the foam are packed closely together, instead of loosely. This provides the foam with strength and enables it to be water resistant, although not waterproof. All instructions regarding safety and application should be followed carefully. Regardless of the type that is necessary for your home, spray foam insulation seals air leaks and continues to save money on energy bills long after it has been used.

Group 1

Closed Cell Foam Vs. Open Cell Foam: What’s The Difference?

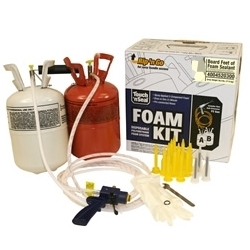
Touch N Seal Foam
Touch N Seal Foam

Applying spray foam insulation to ceilings and walls is one of the best ways to insulate the rooms that act as a passageway for drafts and outside air during extreme weather months; rooms such as the attic and basement. Sealing up the cracks and gaps in these rooms with spray foam insulation helps reduce the amount of energy used to heat and cool the home, as well as the amount of money spent on doing so. Closed cell and open cell Touch N Seal foam are two types of spray foam insulation that can be used for insulating these rooms.

Closed cell Touch N Seal foam gets its name because the foam cells are packed together and closed. The strength and density of this foam allow it to be resistant to water absorption. Additional important details about closed cell foam include:

  • Expansion: up to 30 times when applied at 1″ thick
  • Density: 1.75 +/- 0.2 pounds per cubic feet
  • R-Value: 7.12 per inch

In contrast, the cells in open cell foam are not closed completely or packed close together, and this type of foam readily absorbs water. Keep in mind these important details about open cell foam when deciding which type you need:

  • Expansion: 100 times the liquid volume
  • Density: 0.4 to 0.5 pounds per cubic feet
  • R-Value: 3.5 per inch

Closed cell and open cell Touch N Seal foam are different in a number of ways. While open cell foam typically costs less, the strength, density, and higher R-Value of closed cell foam makes it the more advantageous of the two.

Save

Group 1

How to Install Outlet Insulation in Your Home or Building

Electrical outlets located on exterior walls can act as a gateway for air leaks and energy loss. In fact, this source is responsible for approximately five percent of all energy loss experienced in the average home. Insulation for this area is useful throughout the year. Installing outlet insulation prevents cold air from coming in during winter, and cool air from leaving during summer. Installing insulation for outlets is a simple task that can be completed in a few steps.

Outlet Insulation
Outlet Insulation

In order to install foam insulation without exchanging the original wall plate:

  1. Use a screwdriver, remove the existing outlet plate.
  2. Place the insulating foam gasket behind the wall plate cover.
  3. Place the newly insulated cover back over the outlet.

In order to install outlet insulation that comes with the wall plate:

  1. Remove the existing wall plate using a screwdriver.
  2. Place the outlet cover with the foam gasket already installed over the electrical outlet.

The type of outlet insulation required depends on where it needs to be installed. For single outlets, wall switches, and single decora-style (rocker) switches, the standard foam insulation can be used. For double, triple, or quad outlet and switch sources, the wall plates that come with the foam gaskets pre-installed may be a better option. If you would prefer to not have to get a new wall plate, simply cut the standard foam gaskets into the shape that you need.

Using electrical outlet insulation will effectively seal off air leaks from this area. Insulation can be installed in less than five minutes, and can reduce the amount of energy and heat loss by five percent. For even more detail, check out the video below to see exactly how to install switch gaskets.


Switch Gaskets

Group 1

The Smoke Pencil is a Non-Hazardous Way to Detect Leaks

Smoke Pencil
Smoke Pencil

Air is leaking into and out of a home throughout the day if the home is not properly insulated. Knowing where to apply insulation can become tricky of you aren’t sure where the most air leaks are occurring. While some drafts can be detected by placing a hand to the corner of a window or to the front of an electrical outlet plate, others are a bit more difficult to find. These problem areas are often responsible for a significant amount of energy waste as well as hundreds of wasted dollars in energy costs every year.  Using a smoke pencil to find these air leaks is a simple and safe way to start solving this problem.

Knowing where air leaks are occurring is the first step to reducing the effect air leaks have on energy consumption and costs. A smoke pencil is a battery-operated tool that is used to reveal these leaks. The smoke it creates reveals the movement of air in a specific area, and the quantity of smoke released can be controlled using the multi-function trigger on the tool. It is pocket-sized and can be locked, allowing for use in tight areas and easy storage.

At this point, you are probably wondering how a tool that creates smoke could possibly be safe to use. Typically, draft detectors use harmful chemicals or flammables in order to operate. The smoke pencil differs in that it uses a non-toxic fluid to create the smoke that reveals drafty areas. The fluid contains only water solution vapor, Glycerin, and a sweet smelling Glycol. This makes operating it much safer than would be with another smoke tool. In addition, it can be flown on a plane if you need to travel for a job, or shipped without problem.

Group 1

Weatherization Kit: Easy Way to Seal Drafts

Weatherization Kit
Weatherization Kit

Weatherproofing the home is not as difficult as some might believe. You don’t have to tear your home apart or spend thousands on professional in order to fix some existing problems. Reducing the amount of drafts that come into your home can be done with a few simple items and about an hour to spare. The items in a weatherization kit make sealing drafts simple, quick, and cost-effective.

A weatherization kit is filled with items that make it harder for the cold air to come in, and the warm air to go out.

  • Shrink & Seal Window Kit – Place the plastic from this kit over the windows, smoothing out any wrinkles by passing a hair dryer over it, and it keeps the cold air from coming through the window.
  • Replaceable Cord Weatherstrip – Also used for windows, caulking rope is applied around the edges of windows, to cover the cracks and gaps that can’t be reached with a caulking gun or tube. Insulating windows can reduce energy loss by 10 to 25 percent in the average home.
  • M-D High Density Foam Tape 02253 – The closed cell foam tape reduces air infiltration from doors (and window sashes). Apply it to the clean, dry surface of door jambs, and cut off any excess. Doors make up as much as 11 percent of all heat loss in a home. Air easily slips in and out through doors that are not properly insulated.
  • Foam Outlet and Switch Gaskets – These handy little tools are placed behind the plate covers of electrical outlets and switches that are located on exterior walls. Stopping air from escaping here eliminates about 5 percent of total home energy loss.

All of the items in a weatherization kit are low-cost, making the kit itself a low-cost investment. It is available for about $11, and pays for itself easily with the amount of energy that is saved during winter.